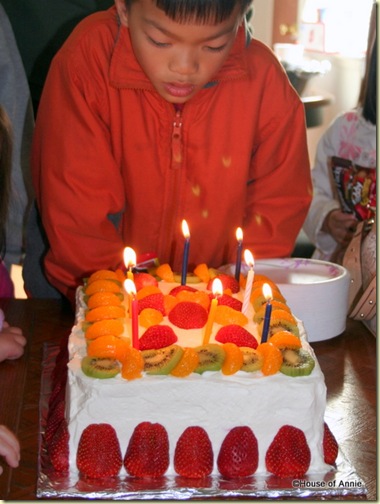
Daniel’s 7th Birthday Cake
When I first had children and started celebrating their birthdays, I’d bake my own birthday cakes for their parties. The very first one I did I used a recipe from Rose Levy Beranbaum’s Cake Bible book and it turned out really well. However, the frosting called for buttercream. While it was a really delicious and not-too-sweet buttercream frosting, it was still a LOT of butter! And I’ve always preferred fresh whipped cream whenever possible.
This recipe from Fine Cooking magazine has been my go-to cake recipe for all special occasions now. I’ve used it to bake birthday cakes and baby shower cakes. Just about any occasion that calls for a cake, I’ve made it. I’ll tell you why.
Vanilla Butter Layer Cake with Fruit from House of Annie — NOT a Bakery!
Better Than Store Bought
Firstly, the cake itself is so delicious and yet so easy to make. Secondly, I’m not a really good cake decorator so being able to pile on fruit makes a cake look so pretty without too much effort. Thirdly, fresh whipped cream is THE BOMB as frosting on a cake and can be easily whipped up and spread on the very day the cake is needed. Finally, the cake looks so professional (you know, people think layer cakes are hard to make) and I’ve had many people ask what bakery I bought the cake from.
The cake itself is a vanilla butter cake and the flavor is seriously amazing. The vanilla sings, and the texture is light without being spongy or airy (which you will find if you get a cake from an Asian grocery store). It is the perfect cake for layering with sweet fruit and lightly sweetened vanilla whipped cream.
Easier Than You Think
And making it is a dream! When I first started baking cakes, I thought there was only one method for making a cake–you know, the creaming method which involves creaming butter and sugar until it is light and airy.
Well, this cake is much easier. It basically calls for all the dry ingredients to be sifted together and then add butter and just quickly mix, followed by the wet ingredients and finally eggs. But the time used mixing the ingredients are so quick that it really whips up in a jiffy!
The only caution I have is you have to bring the ingredients to room temperature so do prepare some time for that. And you can bake the cake the day before the party so that it’s even quicker to assemble and decorate the cake on the day of the party.
Ok, I can’t help myself, I have to say it again. Please, please get yourself a digital kitchen scale! You really need one when baking and it makes life so much easier too (as in you don’t have to wash another measuring cup or extra bowls).
Ok, I won’t say it again.
In this post anyway.
Talk About the Frosting
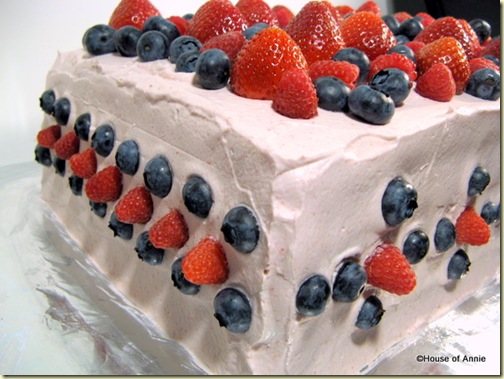
The frosting is also really easy. It’s basically fresh whipped cream with a little bit of sugar and some vanilla. You could easily change the flavors and the color of the frosting up if you want. I’ve pureed and strained berries and mixed it into the whipped cream before to get a pink frosting (my daughter is sooo girlie and wanted a pink cake last birthday! Sigh! In case I haven’t told you, pink is not my favorite color. Can you guess what is?).
Esther’s Pink Birthday Layer Cake
Some tips for whipping heavy cream. Firstly, you want to make sure that your cream is cold and your mixing bowl is cold and your whisk is, you got it, COLD! Secondly, if you’re using an electric mixer to whip the cream, stop shy of it being fully whipped and finish whipping by hand. This way you can get the best texture for the whipping cream and it will have a nice smooth, glossy finish. (How do you know when the cream is ready? When you lift up your whisk, the cream will form a nice, stiff peak.)
Be Creative With Your Fruit
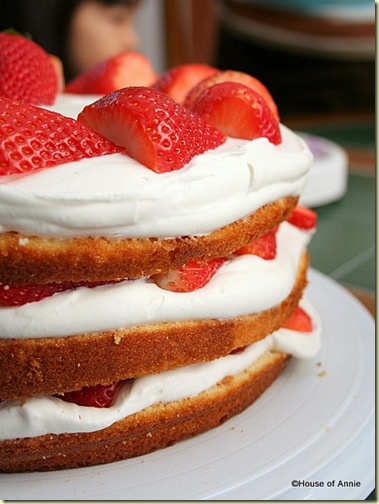
As for the fruit toppings and sides, you can use any fruit you like. I like to use berries when they are in season–strawberries, blueberries and raspberries make a really pretty cake. And you could keep it even simpler by just putting a layer of whipped cream and then piling berries, and then repeating with each layer without bothering to frost the sides. This is a great look for a tea or shower party with a round cake.
Round Layer Cake with Whipped Cream and Strawberries
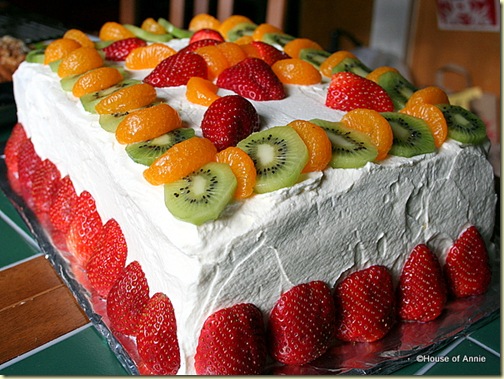
At other times when berries are not in season, I’ve used canned mandarin oranges and peaches as well as fresh kiwi. These are all great fruit for decorating a cake. They make any cake look professionally done. My friend used mango as her fruit of choice and she said it turned out really well too. And you could always use lemon curd or passion fruit butter/curd to fill your cake as well. Very delicious!
So really, your limit is your own creativity. If you’re like me and sometimes don’t feel too creative, go check out a few cake shops and get ideas from them! I shamelessly steal ideas all the time!
Look Between the Layers
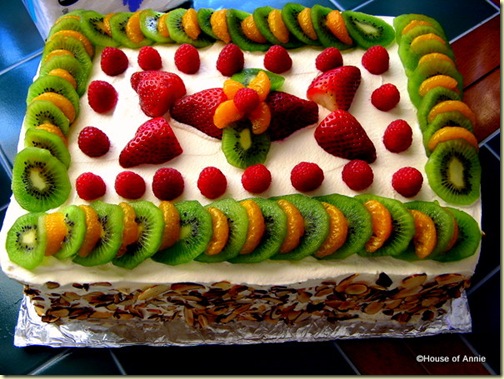
So this cake calls for four layers. When I’m making a rectangular cake (you’d have to double the recipe to do this size), I usually only fill the middle layer with fruit. What I do with the first and third layer is spread on some thinned jam and a little bit of whipped cream to sandwich it together.
In the second layer, I pile on a much bigger amount of whipped cream and tons of cut up fruit (this is where you use the fruit pieces that aren’t as lovely looking–yes people, please select the nicest ones to decorate on the outside). Of course, you can choose to do whatever you like so if you want to fill every layer with fruit, go right ahead!
Vanilla Butter Layer Cake with Fruit from House of Annie
Vanilla Butter Layer Cake Recipe
Makes two 9-inch cakes.
Ingredients
Nonstick cooking spray for the pan
10 1/2 oz (2 3/4 cups) cake flour (and yes, please use cake flour for best texture)
1 1/2 cups sugar
3 3/4 tsp baking powder
3/4 tsp table salt
6 oz (12 Tbsp) unsalted butter, cut into tablespoon-size pieces, at room temperature
3/4 cup whole milk, at room temperature
1 1/2 tsp vanilla extract
4 large eggs, at room temperature
Method
1. Position rack in the center of the oven and preheat the oven to 350 F.
2. Lightly coat two 9×2-inch round cake pans with nonstick cooking spray and line the bottoms with parchment paper.
3. Sift the cake flour, sugar, baking powder and salt into the bowl of a stand mixer fitted with the paddle attachment. Mix on low speed (#2 on a KitchenAid mixer) until the ingredients are well combined.
4. Add the softened butter pieces and mix on low speed for 20-30 seconds to mix the butter into the dry ingredients–the mixture should look a little lumpy, with the largest lumps being about the size of a hazelnut.
5. Add the milk and vanilla extract and mix on medium speed (#5 on a KA) for 1 minute to thoroughly blend the ingredients and aerate the batter. Scrape the sides of the bowl with a spatula.
6. Add the eggs one at a time, mixing on medium speed for about 15 seconds after each addition. Scrape down the bowl after the second egg.
7. Divide the batter equally between the two prepared pans (how? yuppers…kitchen scale! Oops! Sorry, I did promise, didn’t I? Ok, zipping it now) and use your spatula to smooth the surface.
8. Bake until the cakes are golden brown and a cake tester inserted in the center of the cake comes out clean, about 30-35 minutes.
9. Set the pans on a rack, run a table knife around the edge of each cake and let cool in the pans for 30 minutes.
10. Invert the cakes onto the rack, lift the pans, peel off the parchment, and reinvert back and let cakes cool completely. If baking ahead, wrap cakes in plastic once fully cooled.
Vanilla Whipped Cream Frosting Recipe
Yields about 7 cups, enough to fill and frost a 9-inch four-layer cake.
Ingredients
3 cups heavy or whipping cream
5 Tbsp sugar (I normally use only about 4 Tbsp)
1 1/2 tsp vanilla extract
Method
1. Chill the bowl and whisk attachment of a stand mixer for 20 mins in the fridge or 5 mins in the freezer. Pour the heavy cream into the bowl and whisk on med-high speed until it just starts to thicken.
2. Slow the speed down to medium and gradually pour in the sugar. Continue to whisk until soft peaks form.
3. Add the vanilla extract* and continue to whisk by hand until the cream is smooth, and stiff peaks form (the cream will stand up straight when the whisk is raised).
*Instead of vanilla, you could also make a raspberry or strawberry "pink" whipped cream by subbing the vanilla with 2 1/4 cups raspberry/strawberry puree (puree the fruit in a blender and strain) and add an extra 2 Tbsp sugar to the whipped cream.
Assemble cake:
1. If the cakes have a slight dome after baking, cut to level them (best to use a serrated knife). Then, cut cake in two layers. I use a Wilton cake leveler that I got from Michael’s for that purpose but using a knife will do just as well. If I had to use a knife, I would trace a line around the middle and then cut following that line (sometimes I poke toothpicks around the center to give me a guide).
2. Prepare the fruit (you will need about 6+ cups of fruit if you fill every layer). Choose the nicest strawberries and if possible look for the ones that are closest in size to each other and slice in half. Chop up about half a cup of strawberries for filling in the center. Peel and slice kiwis into rounds (about 3 kiwis). Chop up the end pieces to use in the middle filling. Drain any canned fruit you might be using.
3. Place the first layer (bottom of one cake) on your cake plate or board (if I’m using a rectangle, I just cut out a piece of cardboard a little bigger than my cake and wrap it in heavy duty aluminum foil). Depending on how you want to decorate, you could spread some thinned jam (you could thin with water or some 3 Tbsp liqueur, like brandy or Grand Marnier) and a thin layer of cream OR you could take 1 1/2 cups whipped cream and spread right to the ends of the cake and add fruit.
4. Add second and third layers and add more jam/cream or cream and fruit.
5. Finish by placing the final layer (I like to use the flat bottom of the second cake as the top so that the cake is nice and flat at the top). Spread the last of the whipped cream on top and if covering the entire cake, make sure that you have left enough to cover the sides as well.
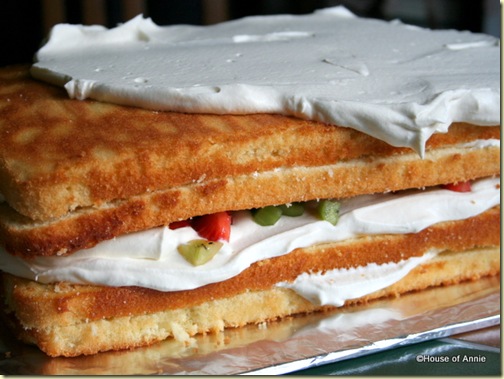
6. Decorate artfully with fruit. Wipe up crumbs and smears. Refrigerate till ready to serve. It is best to frost this cake the day you plan to serve it.
Enjoy!
Cheers, Annie

>ooo that cake looks divine! and yes i do love freshly whipped cream frosting. buttercream can be too rich! will definitely try out this recipe!
i’m looking for a sugar cookie recipe (gonna make cookies for a kid’s birthday party)..any tips you wanna share with me?
>Love how you used the fruit to decorate the cakes. Very creative and healthy. Just needs a few dark chocolate curls. ;o)
>@Laura – you could add a little gelatin to help stabilize it. But I would still refrigerate it.
@8chocolate – now THAT is a great idea!
>This site depicts a colorful cakes with the presence of strawberry makes it very amazing.
justice
————
Free Satellite TV
>Found your blog on a search and baked your cake base. GREAT recipe! I also linked to you from my blog. Hope you don't mind 🙂
http://www.nycnomnom.com
~Sara
Those are beautiful cakes! I can see why people would think that they are store bought. What are the different mixing speeds if we don’t have a KA mixer though? Thanks for sharing this recipe!
Esther, I’m not quite sure what the question is that you’re asking. In my instructions, I mentioned low speed and medium speed (with the KA speed numbers in parentheses). What exactly did you mean by different mixing speeds other than what I’ve stated. I’d like to be able to help you but I’m sorry, I don’t quite understand.
How do you move the layers after cutting them? Is there something you use to lift them so you can spread the jam/cream/fruit? Thank you! Beautiful cake! I am going to attempt it for my daughter’s baptism reception. Wish me luck!
Christine,
you just very carefully lift off the top layer with your fingers. If you’re afraid it might break, use a plate or something. If it breaks, no big deal – once you’ve frosted it no one will know! 😉
Hello, I have just come across this on a google search cakes look awesome & I would like to give one a go BUT I am in the uk so am wondering what to do when you use cake flour as we dont have cake flour here :o(
Have you tried making it using plain or self raising flour?
Thanks
I have made this cake once using plain flour but the texture wasn’t as good. If you plan to use plain flour, I would recommend taking out 2 Tablespoons of flour for every cup and substituting 2 Tablespoons of cornflour in its place (ie, about 6 Tbsp flour taken out and replaced with 6 Tbsp of cornflour).
That said, there is nothing better than using cake flour. I did a google search and perhaps in the UK, the term that is used is different–cake flour is also sometimes known as soft flour, or superfine flour. I believe it is possible to find these types of flour in the UK.
Hope that helps!
Hi! Love your website. Your layered cakes are beautiful! I tried your recipe and the problem I had was the cake came out a little dry. I live in Albuquerque, NM….I’m thinking maybe because of the altitude we are at – 5200 feet.
Perhaps I need to make a small adjustment to the amount of cake flour? Or use less egg? Any suggestions?
Thanks!
Mimi
Your cakes are simply awesome!!
I need your help. Planning to do a cake for 50 people, using 2 13×18″ pans. One layer will be yellow, the other chocolate. Do you have recipes for both of these favors?
Your suggestions will be really appreciated.
Hi Annie, I just love how you cut your cake layers so evenly. Can you please do a tutorial or a blog post on how you are able to cut the layers so evenly?
Also I love how you decorate your cakes with fruits and how evenly you coat the cake with frosting. Can you also please do a tutorial on that as well? The cake itself looks so moist and delicious.
I have baked your marble buttle cake quite a few times and everyone loved it. The cake was moist, soft and buttery. My house smell very yummy every time I bake your marbuttle cake, you call marbuttle cake, I also call it marbuttle cake. Not marble cake. 🙂
Hi Rand,
I’m so glad everyone lives the cake!
We use a Wilton Cake Leveler to cut the cake layers. Here is a tutorial on YouTube:
http://www.youtube.com/watch?v=S7CW-si2JjA
Can I ask. The recipe above, does that make two 9″ round layers or 1 13″ by 9″ rectangle pan? Or 2? I’m confused. Thanks
Tara,
thanks for your question.
It makes two 9″ round, or one 9″x13″ rectangle. If you want to make two 9″x13″ cakes, you’ll have to double the recipe.
Great thanks!
Hi
Thank you so much for the recipe. I am going to be trying this out, but have a clarification to make. Is the sugar that is used for cake is granulated sugar or confectionary sugar? Also if I half the ingredients can I make one two layer cake.
Thanks
muthu