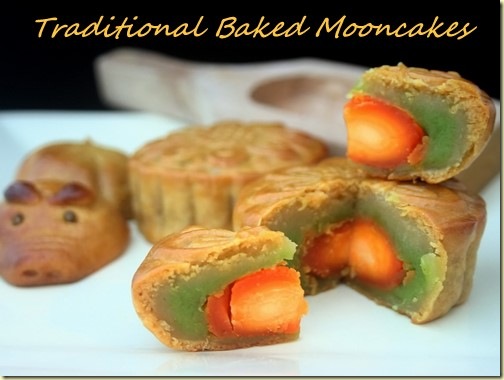
This is the recipe for the traditional, baked Chinese Mooncake that is typically eaten during the Mid-Autumn Festival. The mooncake filling consists of a salted egg yolk, surrounded by sweet lotus seed paste, which is wrapped in a thin, tender skin and then pressed into a round or square mold to impart a design onto the skin. The cake is partially baked, brushed with an egg wash, and then finished in the oven.
Last year, I got into making snowskin mooncakes and pandan spiral mooncakes for the Mooncake Festival. (The pandan spiral mooncakes are seriously awesome; I already have orders for more.) However this year, I decided that I had to try my hands with the traditional baked mooncakes. After making three batches of these mooncakes recently, I can say that they’re pretty simple to make, and they come out as good as or even better than store-bought.
Not Hard At All
Now, I’ve always thought that making traditional baked mooncakes were difficult. At least it seemed that way when people talked about how you had to get the skin right or it would not taste good. So I just never thought I’d be able to do it.
With Mooncake Festival just around the corner, I’ve made three batches of these mooncakes so far. I must say I’ve learned a lot about baking them. Are they really that difficult?
Honestly, if you live in Asia where the filling ingredients are easy to find and buy pre-made, and most of the other ingredients for the skin are also prepared for you, it’s not really hard at all. If you live in the West, where the ingredients may be more difficult to find and you’d have to make everything from scratch by yourself, then yes, I’d say it would be tougher.
So while I’m here in Malaysia, I’m taking full advantage of the fact that I don’t have to stir up my own batches of lotus paste filling. I can just drive to the nearest bakery supply store and buy myself some (they even come in low sugar varieties which is perfect for me!).
Baked Moon Cakes Recipe
Prep time: 1 hour / Cook time: 30 minutes
Ingredients for the skin
240 grams mooncake golden syrup
75 grams cooking oil
1/2 tsp baking soda
1/2 Tbsp alkaline water
300 grams superfine flour
Method
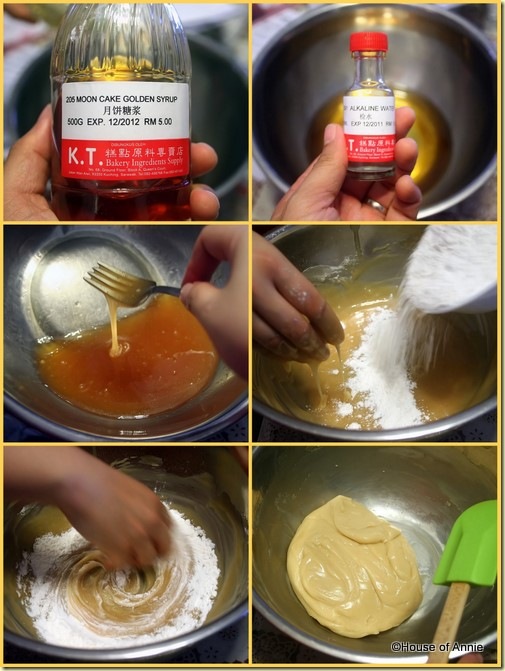
- Combine golden syrup, cooking oil, baking soda and alkaline water in a bowl and mix well.
- Slowly add the superfine flour to the liquid, using your hand to mix the ingredients well. The dough will be sticky like taffy.
- Wrap the dough in plastic wrap and set aside for at least 3 hours and up to 3 days.
Making Traditional Mooncake Skin Dough
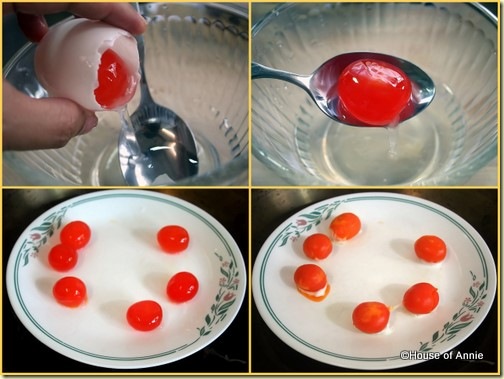
- If you’re planning to use salted egg yolks in your filling, you need to separate the yolks from the whites, then steam the yolks for 10 minutes over medium-low heat. Let the yolks cool before using.
Steaming Salted Egg Yolks
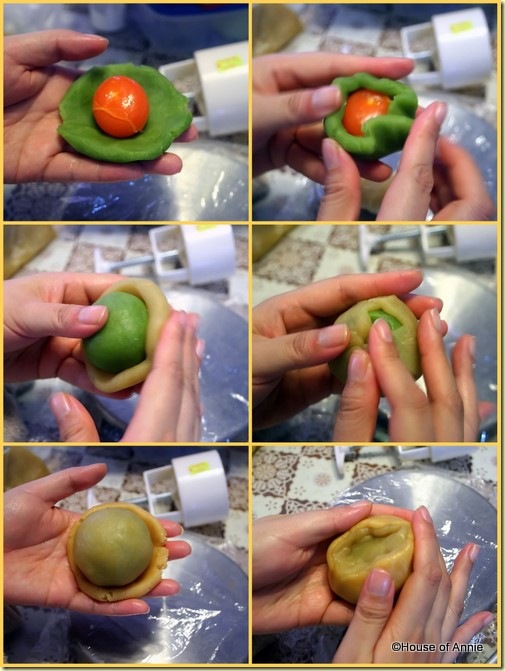
- Enclose the egg yolk in lotus seed paste filling (how much? It depends! See Tip #2 below). Take some of the dough for the skin and form a disc, then gently but firmly push the skin dough around the filling. Check often to see if there are any breaks in the dough.
Wrapping Traditional Mooncakes
- Preheat the oven to 200 degrees C.
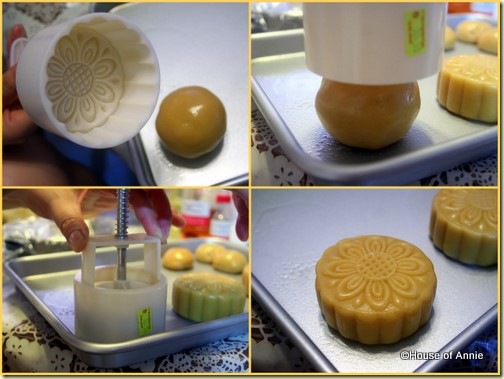
- Press the ball of dough and filling with the mooncake mold to impart the design. Set the molded cake on a greased tray.
Pressing Traditional Mooncakes
- Bake for 10 minutes, then remove from the oven to cool for 10 minutes.
- Lightly brush the top and sides of the cake with an egg yolk wash.
Brushing Traditional Mooncake with Egg Wash
- Return the tray to the oven and bake for another 8 minutes at 200 degrees C.
- Remove cakes from the oven and cool.
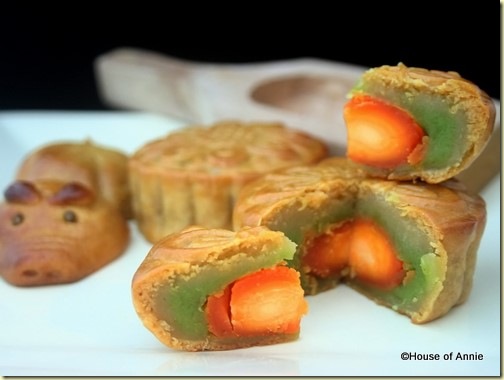
Traditional Baked Mooncakes
Important Mooncake-Making Tips
Most recipes you find on making mooncakes will only give you a list of ingredients and then provide simple instructions. Not so easy if you’re a newbie to making them and need more detailed instructions.
So here are some tips for mooncake making that I’ve picked up by talking to the bakery supply shop owner (who teaches a mooncake-making class) while buying ingredients, through reading recipes online and from mooncake cookbooks (yes, I actually bought a cookbook talking specifically about mooncakes) and by experimenting as I made my own:
Tip #1: Patience
Making traditional mooncakes is all about waiting.
After you’ve assembled all your ingredients and mixed it up, you have to wait. The shop owner told me to wait for three hours, which I did for the first batch. The cakes turned out alright but I decided to save half the dough to make more the next day and THOSE mooncakes turned out even better.
I guess you need to give the dough time to develop and smooth out. When you first mix the dough together, it has an almost taffy like texture–very sticky and wet. But after a long wait, the dough is smooth and tacky. Very much like soft Play-Doh and very nice to work with when you’re trying to stretch that skin as thin as possible to wrap around a large amount of filling.
Also, after baking the mooncakes, you should not eat them right away. Give your cakes a day before cutting into them. The skin will soften up a little bit more giving it the right texture and chew.
So, a long wait time before using the dough and a long wait time after baking the cakes and your mooncakes will be beautiful and tasty.
Tip #2: Precision
As with most baking recipes, you need to have a weighing scale when making mooncakes. The general rule of thumb on baked mooncakes is a ratio of one part skin dough to three parts filling. For example, if your mooncake mold can hold 120g of mooncake, then divide that number by four, thus making your skin 30g, and your filling 90g. If you add a salted egg yolk to the filling, then you need to weigh that and subtract that weight from the 90g of filling that you need.
Tip #3: Play
Making mooncakes may take patience and precision but it also has an element of fun. If you are the sort of person who likes to work with your hands, you will enjoy making mooncakes.
When you are mixing the skin dough, it is recommended that you mix with your hand–if you’re squeamish about getting your hands sticky, then this is not for you, but if you don’t mind, mixing with your hand gets the job done very well. I normally don’t like having sticky hands but this time around, I didn’t seem to mind it. I just considered it as extra exercise (the dough gets stiffer as you finish adding the flour slowly).
You also need to knead the dough after the resting period to make it more pliable. As you knead it, the color of the dough becomes more white and when you stretch it out, it will be more smooth and be less likely to break.
Another part of play happens when thinking about the filling. To date, I’ve bought white lotus paste, pandan lotus paste, durian pandan paste, and red bean paste. Initially I was using one paste for one mooncake but then I decided to try mixing them around. So recently, I wrapped one paste with another (keeping in mind the total weight) to see if I could get a different taste and visual effect. So far, I’ve mixed pandan with white lotus (the green color against the orange yolk is beautiful), and red bean with white lotus. I’ve been having fun!
The final part of play is the challenge of stretching that skin evenly to wrap around the filling. If you’ve kneaded it well, the dough will be pliable enough to stretch slowly into a thin skin for the filling. Don’t worry about perfect thickness too much as I usually find one part that is slightly thicker (the thinner part will have the filling shining through). This is not a bad thing as I use this thicker part for the part of the cake that receives the design. As you press the dough into the mold, the mold creates a beautiful design in the thicker skin.
Go For It
So there you have it, the traditional baked mooncake recipe. I hope you get to try it out for yourself. It really is easy once you get the hang of it, and it’s fun to do. Enjoy!
Cheers, Annie
If you like this recipe, please share it with your friends on Facebook, Twitter and other social networking sites!

Hi Annie!
Thisis my second year to celebrate Mid-Autumn Festival in China. Today we went to school and made mooncakes with the kids. They had all the fillings and the dough already made.
My family, except my little girl, find the mooncakes to be too sweet or just not to our taste. I was told one bakery here was making some with peanut butter filling. It got me thinking that some of the western cookie doughs might be yummy inside. Have you ever thought to play with the fillings in a non traditional way?
A teacher tried to tell me where to buy the sweet molds we used but I just don’t knw the markets enough find my way to them but I’m so going to get my hands on some soon!
Annie,
In your “wrapping” photo collage, it looks like you wrap the paste twice with the skin, but I don’t see anything in your instructions about it. Not the salted egg part, but the bottom four photos.
Is it a mistake?
Shellei
No mistake. In the top pair of photos, we are wrapping the egg yolk with pandan lotus paste (green). Then in the middle pair, we are wrapping with regular lotus paste (blonde). The bottom pair shows us wrapping with the skin.
Yes I agree with shellei, I cannot see in your recipe the pandan
Lotus green. What kind of ingredient is pandan lotus? Is it liquid? Tnx
Meltiu
Meltiu
Pandan lotus paste is just pandan-flavored, green lotus paste.
Really well-explained step-by-step that I feel like I can make it on my own (but I’m not very good with dessert making so I rather “watch”). Absolutely gorgeous mooncake!
Wow, your mooncakes look really special!!! Sadly, I cannot buy good quality mooncakes in Basel.
Hi, Nate,
I tried half recipe of the traditional mooncakes.The dough was still tacky after the next day taken out from the fridge. I hardly could
form it so i added some more flour on each dough. I baked them as instructed but they were not brown enough so i let them 2 more minutes. When i opened the oven,my goodness¡ my almost perfect mooncakes cracked. I couldn´t wait till 2 or 3 more days
i just took one and ate it. Oh….it was so…..good.
The next day i made the whole recipe. Although their sizes were not really uniform and some designs blurred but this time i got almost perfect ones. It means succesful.
I have questions :
1. How to solve the problem of the dough – should i add the
flour when i take out the dough from the fridge and knead it
and let it rest for a while or just add it to each dough?
2. How to get the perfect design.
The Mid-authum festival was over. I have to wait for next year to make and enjoy these home-made mooncakes again. Thank you for your help so i could make my very first and yummy mooncakes in my life. It´s pity that my 2 kids don´t like but on the contrary, my Spanish & Chinese friends said they were very good. This recipe will be definately in my file.
Your mooncakes looks beautiful with their design. I’m excited to try my new oven, and your mooncakes recipe is perfect for my first try.
Hi,
Where can I buy the Mooncake golden oil?
Thanks
Jennifer –
Thanks for your question. Where are you located?
Hai Annie, today I try to make mooncakes using your recipe.
The result really satisfying 🙂
Thanks for sharing your recipe 🙂
The recipe works? No need learn from some 1-day hands on lesson and just follow the instruction from this website? My friend tried making traditional mooncake based on reading recipe alone but the skin turn out to be hard!
Just a few questions about the ingredients. Instead of using moon cake golden syrup????
That’s a very detailed tutorial. Thanks for the tips! I’m going to make some this weekend.
Dear Annie, I have been trying out your mooncake recipe couple of times and not successful. The mooncakes taste ok.the moulding of the mooncake is find before baking but the shape melted after baking, therefore the mooncake is totally out of shape, it looks like the mooncake is having a flare skirt. Please let me know why. thanks
Hi Wendy,
baking soda makes the dough softer, so you could either try omitting the baking soda or letting the dough rest a day before making your mooncakes.
Hi,
Do you have to use alkaline water or is tap water okay? Thanks
I have found that if you add just a tiny bit (1/4 to 1/2 tsp or so) of baking soda, and then let the dough sit for 2 to 4 days it works. Lye water is faster acting, but often hard to find. I have heard of people making their own, but pure lye is pretty dangerous, and not sure what the water to lye ratio should be, heard it is 1 part lye to 100 parts water, but not sure I would use that.
can plain water replace alkaline water?
Chenda,
thanks for your question.
Alkaline water, also known as “lye water” or “kan sui” is a product used in baking to make the dough more pliable and smooth. You can leave it out, but your skin might crack.
where can we buy alkaline water
Herms,
Look for “lye water” in any large supermarket, drugstore or baking supply store.
Hi, i’ve looked at a few baking stores in Singapore and dont seem to find the mooncake golden syrup. Can you please advise if you know any suppliers in Singapore or if any shop in Malaysia that ships to SG? Thanks in advance
Though I made my own golden syrup the first time (pretty easy but time consuming) I now just use maple syrup (not the imitation flavored) but not sure you can get that in Singapore.
Thanks for the tips! They help me understand the science and art of making mooncakes a little more. What mooncake cookbook do you have? Would you recommend it?
Thank you for your time and help!
Hi Annie, I like your moon cake recipe and I tried few times already,the only thing bumped out is I don’t have Alkali.
Could you please tell me where to get it in the US? If not, what websites should I go to get it?
Thank you for your wonderful recipe, I am looking foward to hear from you soon:-)
Annie
You may wnat to venture into enchanted Territory of Salted Mooncakes, good idea for diabetics consumption.
A large portion of Malaysian fall into this market segment.
I for one will be a consumer of this.
Thanks
Although not truly a traditional moon cake, I have made them with a variety of fillings. My personal favorites are various types of dried fruits, whole dried figs, or fruit pastes. Instead of Lotus, I have also used pine nut paste, but you have to make sure you get fairly fresh nuts for that as they can go rancid within a few months. Basically I have found that as long as you get the dough right, you can make moon cakes from a wide variety of ingredients. You may not be able to find some things – I had to make my own apricot paste from dried (you cannot use jam or fresh ones – too watery and/or too sweet).
Hi, thanks for sharing this detailed recipe. Taste tested it yesterday after cooled and will try again today. Tasted nice, especially with extra `kua chi’. The filling being the pre-packaged one was too sweet. Easier to get the pkt in Melbourne 🙂
I made lots of mistakes, hoping someone can help with these issues:
The dough was very oily when shaping and didn’t retain the shape after being baked. Is it because I had it resting for 4 days instead of the max 3 days? Kept in fridge
Tasted and smelt oily. I used partial peanut oil and canola oil as I ran out of canola. Should I just use vegetable oil next time?
Skin cracked and `crazed’. I don’t want to use lye water (not confident enough) so I replaced with glucose syrup of same amount as glucose apparently helps soften items. Could it be this reason?
I didn’t have mooncake syrup but since I figured it’s basically golden syrup I watered down the store bought one and cooked with some lemon slices. The fragrance is just like the mooncake smell!
Thanks and happy festival 🙂
Hiya love moon cakes but I want the biscuit version of moon cakes
Hi, do you have the recipe for the lotus paste?please let me know if you have it as i do not know how did you make the paste.
Thank you very much for those recpes. 🙂
this sounds like so much fun! can’t wait to try it out this month for mid-autumn moon fest coming up! yey!! so glad i found your site.. i’m going to try the pandan spiral moon cake too 😀
Hi what happy to my mooncake follow every step but i find out my moon cake became hard as a stone
plz advise
Dear Anne,
Did you wait one day? The skin of the moo cake right after baking tends to be harder and will soften as you let it sit a day or two. If that’s not the problem, I can’t say unless your ingredients are different somehow. Hope that helps.
Dear Annie
I am going to try your mooncake recipe.
Can you please advise when you say leave the dough rest for 3 hours or up to 3 days, shall we leave it under room temperature or in the fridge ? Thanks a lot !
Kelly,
room temperature will suffice.
Hi Nate
Thanks for your reply.
If 3 hours, I believe room temp. is ok.
But if I want to leave it for 3 days, I shall put in the fridge right ?
Thanks !
Kelly